Teams

User Account Roles Required to Configure Teams Direct Routing

The following are the user accounts roles required to configure Teams Direct Routing

Global Administrator

A user with a Global Administrator role is required to check and manage the settings of the tenant. If there are any changes in the tenant settings. This user account should be used in case of any.

Teams Service Administrator

A user account with this role is required for creating, managing, and viewing a Teams direct routing configuration. That includes things like registering SBC as a gateway, creating dial plans, and voice routing policies.

Of course, if you have access to a Global Administrator, you don’t need a user account with the Teams Service Administrator role. But it is always better to use a user account with minimum required privileges.

Skype for Business administrator

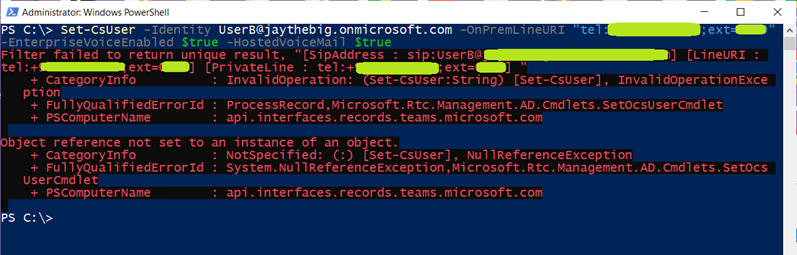
You also need Skype for Business administrator role. This role is required for enabling Teams users for direct routing, which includes enabling enterprise voice, hosted voicemail, and setting a direct routing phone number.


Usually, I ask my customers to create a user with the Teams Service Administrator role and Skype for Business administrator role. And they are ok with giving me its credentials so I can use it freely. When I have changes that require a Global Administrator. I ask and guide the customer to do these changes.

The following image shows Teams Service Administrator role and Skype for Business administrator role both selected for the same user (in Admin Center of Office 365):

Set-CSuser Fails If When Using The Old MicrosoftTeams Module

This happened to one of my customers

After using

Import-Module -Name MicrosfTeams

and connecting to teams using Connect-MicrosoftTeams

I tried to use Set-CSUser to assign the LineURI and other information

But, we were getting

Get-CsUser : The term ‘Get-CsUser’ is not recognized as the name of a

cmdlet, function, script file, or operable program. Check the spelling

of the name, or if a path was included, verify that the path is

correct and try again. At line:1 char:1

It seemed that we were using an old version of MicrosoftTeams module

In fact, many of the PowerShell commands that are used to manage Teams Direct Routing might fail if you are using the old version of MicrosoftTeams module

I asked my customer to close all of the opened PowerShell windows and open a new one and run the following command to uninstall the old module.

Uninstall-Module -Name MicrosoftTeams -Force

After that, we run:

Install-Module MicrosoftTeams -AllowClobber

And also connected to teams using

Connect-MicrosoftTeams

After that, Set-CSUser worked fine

Remember, many of the PowerShell commands that are used to manage Teams Direct Routing might fail if you are using the old version of MicrosoftTeams module

Connect-MicrosoftTeams : The term ‘Connect-MicrosoftTeams’ is not recognized

When you run the PowerShell Connect-MicrosoftTeams on the machine for the first time, you might get the following message

Connect-MicrosoftTeams : The term ‘Connect-MicrosoftTeams’ is not recognized as the name of a cmdlet, function, script

file, or operable program

To fixe this, do the following:

Start PowerShell as Administrator and run the following command

Set-ExecutionPolicy -ExecutionPolicy RemoteSigned

Filter failed to return unique result

When you try to enable a user for Teams DirectRouting and assign a LineURI to a user using a command such as the below

Set-CsUser -Identity user@domain.com -OnPremLineURI “tel:+xxxxxxxxxxxx;ext=xxxx” -EnterpriseVoiceEnabled $true -HostedVoiceMail $true

And you get the following error:

Filter failed to return unique result

This might mean that the LineURI is already assigned to another user

You need to first remove the LineURI from the other users

To remove the Line LineURI (which represents the phone number that is assigned to the user) from a user

Removing the licensing of Office 365 is not enough would disable users on Teams, but the LineURI will remain unusable

To solve the issue, you simply need to run the following on the old user

Set-CSUser olduser@domain.com -OnPremLineURI $null

The would set LineURI and the number will be free to be assigned to another

You can run to assign again the same LineURI to the another user

Set-CsUser -Identity user@domain.com -OnPremLineURI “tel:+xxxxxxxxxxxx;ext=xxxx” -EnterpriseVoiceEnabled $true -HostedVoiceMail $true


Skype for Business Online PowerShell connections is blocked.

If you try to get connected to Skype for Business Online using power shell, you will get the following message

Details: Error processing command: Processing data from remote server admin3e.online.lync.com failed with the following error message: Skype for Business Online PowerShell connections are blocked. Please replace the Skype for Business Online PowerShell connector module with the Teams PowerShell Module.

The name of the server might varies

The reason for this is that Skype for Business Online PowerShell is blocked (mostly they will not unblock them)

Use the following commands instead ( these commands utilize the Microsoft Teams PowerShell module)

First, install the Teams Module (which needs to be done only once on the machine):

Install-Module MicrosoftTeams -AllowClobber

This will download and install the module


If you do not install the module you will get the following error message”

Import-Module : The specified module ‘MicrosoftTeams’ was not loaded because no valid module file was found in any module directory.

Now, prepare the session using the following commands:

Import-Module MicrosoftTeams

$cred=Get-Credential

Connect-MicrosoftTeams -Credential $cred

The advantage of using $cred=Get-Credential is that you can use Connect-MicrosoftTeams -Credential $cred if your session expires and there is no need to supply the users id and password because the credentials are stored in the $cred variable and will remain available during the PowerShell window

But in the case of having Multi-Factor Authentication (MFA) enabled on your organization (Even if the account you are using is not enabled for MFA, you need to simply use it. Otherwise, you will get an error

Connect-MicrosoftTeams

The disadvantage of this method is that every time the session expires, you need to supply the user and password. But unfortunately, this method is not available if you have configured MFA in your organization.

So, in the case of using MFA, the following is how to prepare a new session

Import-Module MicrosoftTeams

Connect-MicrosoftTeams


Installing a Certificate (with its private key) on Ribbon SBC 1000 / SBC 2000 / SBC SWe Lite / SBC Edge

The steps below show how to install a certificate with its private key with the *.PFX format on SBC 1000 or SBC 2000

Installing such a certificate is needed when you are configuring your SBC to work with Microsoft Teams Direct Routing

The same steps can be followed in case you want to install a private certificate for example you are configuring the SBC to work with the on-premise version of Skype for Business

Note:

Before you install the certificate, you need of course to install the certificate of the Root CA where you have requested this certificate from and also you need to install an intermediate certificate(s) if that is required by your certificate provider. The procedure of installing certificate of the Root CA and Intermediate CAs are mentioned in a previous article.

The following    are the steps:

On the web interface, go to Tasks Tab


Go to SBC Easy Setup> Certificates


Click on SBC Edge Certificate

This will show the currently installed certificate on the device, and it will also give the option to import a new certificate


To import a new certificate

Click on Import > “PKCS12 Certificate and Key”

(This article only explained how to import a certificate and its key)


 A new window will pop up

select a *.pfx file and supply the password that is protecting the file


 Click on OK


 Click on OK


 The new certificate and the private key associated with it will be installed on the device and it will be shown under SBC Edge Certificate


Installing Certificates of Public CAs on Ribbon SBC 1000 / SBC 2000 / SBC SWe Lite (SBC Edge)

Before installing the public certificate, you have purchased for your device to make it work with Microsoft Teams Direct Routing, you need to install the certificate(s) of the public CA of your certificate provider (to trust that public CA)

You need to install the certificates in the following order:

  • Root CA cert
  • First Intermediate CA (the one issued by the Root CA)
  • Second Intermediate CA (the one issued by the First Intermediate FCA)

Below are the steps showing how to install the certificate of your CA

Go to Tasks Tab > SBC Easy Setup > Certificate > Trusted Cas Tab


Click on “Import Trusted CA Certificate”


The “Import Trusted CA Certificate” pops up


Click on “Mode” and select “File Upload”


It will change to “File Upload” mode


 Click on Browse


 Select the Certificate of CA file and click open


 The CA certificate will be uploaded.


Repeat the same steps if there is any intermediate certificate required by your certificate authority.

Installing Baltimore CA Certificate

If you are configuring your device to work with Microsoft Teams Direct Routing, Baltimore CA is required for communication with Microsoft Teams Servers over the internet. The device needs to trust this CA in order to have TLS communications with these servers.

User the same method mentioned above to install this certificate.


Enabling and additional PRI for Ribbon SBC 1000 / SBC 2000 after configuring the first PRI

In this article, I will explain how to setup additional PRI (ISDN) and configure to have the same configuration and behavior as the first PRI (assuming that we already configured the first PRI).

This is useful when you need to have more than 30 channels (concurrent calls) and you need to have the same configured settings and routes as the first the first PRI (each PRI support 30 channels)

Go to the settings tab

Click on the “Create Signaling Group” menu, then select “ISDN Signaling Group”

The “Create ISDN Signaling Group” dialog box will pop up and will be ready for filling

I kept the name of “Description” of the new signaling group same as the first one, but ending with (7.2) instead of (7.1) to indicate that I am using the second ISDN port

I am trying to use the same settings that was used in the first Signaling Group that was created by the wizard

Most important setting is the Call Routing Table, which control where the calls coming from this Signaling Group will be sent to.

Afte filling the dialog box, click on OK

The new Signaling Group will be shown under the list of the Signaling Group

If the PRI cable to connected, the Signaling Group will be up and will be shown as green

Making the new Signaling Group as the destination for the outgoing calls from Microsoft Teams

Expand Settings Tab > Call Routing > Call Routing Table

Select the call routing table that is used for the calls that are going out from Microsoft Teams

Expand the entry on table by clicking the arrow that is next to it

The details of the entry will be shown

Scroll down to “Destination Signaling Groups”

Click on “Add/Edit” button

Select the newly created signaling group and make sure that the original first ISDN Signaling Group is remained selected and click on the OK button

You will be back to Routing Table entry, and you will notice that new Signaling Group is listed as a destination

Click on Apply

Changing Ribbon the Name of SBC 1000 / SBC 2000 / SBC SWe Lite (SBC Edge) after Doing Microsoft Team Integration

After running the “Easy Config Wizard” to integrate the SBC with Teams Direct Routing, the customer informed me that they need to use another name for the SBC

So, I have done the following steps

  • Installed a new certificate that contains a subject name that is equal to the new name of the SBC
  • Register the new name of the SBC using the PowerShell command New-CsOnlinePSTNGateway
  • Changed all the voice routing policies to use the new
  • Unregistered the old name of the SBC using Remove-CsOnlinePSTNGateway
  • Changed the name of the SBC using the web interface under Settings tab > System > “Node-Level Settings

After that I noticed that the calls are failing and when I checked Teams Admin Center, I noticed that there is a warning next to the new name of SBC under Voice > Direct Routing

If clicked the warning, and I got the details below

The title of the warning was “No SIP Option warning” and the body of the warning was

The Session Border Controller exists in our database (your administrator created it using the command New-CSOnlinePSTNGateway). But we have difficulties determining SIP Options status. Please check in 15 minutes

Although there are other reasons for this warning, I guessed that the reason was that the SBC is still communicating with Office 365 servers with its old name and that would cause the TLS to fail

I have tried the steps under the section Changing Host Profile Settings below and that fixed the issue.

But first, here are the steps for changing the name of the SBC under “Node-Level Settings

Changing the Name of the SBC

In case, you haven’t changed the name of the SBC under “Node-Level Settings“, here are the steps

On the web interface, click on the Settings tab, expand System and click on Node-Level Settings

The Node-Level Settings are shown

Under Host Information, type the new Host Name and Domain Name if needed

Click on Apply

Changing Host Profile Settings

Go to Settings Tab > SIP > SIP Profiles and select the SIP Profile that is used for Teams Direct Routing integration

Usually, you have used “Easy Config Wizard” to create the integration with Teams, so the name of the SIP Profile is “Scenario_Name: Teams Direct Routing Profile”

In my case the Scenario Name I have used during the running “Easy Config Wizard” was Teams, that is why the name of the SIP profile is “Teams: Teams Direct Routing Profile” as shown in the image below

The following is what the SIP Profile for Teams Direct Routing would look like

Scroll Down to “SDP Customization”

Change “Origin Field Username” to the new name of the SBC and click apply

With this, your SBC will communicate to Office 365 / Teams server using the new name

Note:

  • Don’t forget to register the new name of SBC using the PowerShell command New-CsOnlinePSTNGateway
  • Don’t forget to install a certificate that uses the new name

Error While Trying to Move A User to Teams Saying That the User Has Not Been Assigned “Audio Confronting License”

I have tried to move a user from Skype for Business to MS Teams using the Control Panel of Skype for Business. But I got the error shown in the image below

I expanded the message to see the full text of the error

The error is saying:

Move-Csuser :: HostedMisrat ion fault: Error=(511), Description=(The user could not be moved because he or she is enabled for dial-in conferencing on-premises, but has not been an assigned an Audio Conferencing license in Office 365. Users must be licensed before they can be moved to Teams or Skype for Business Online).

This indicates that the user dial-in conferencing on Skype for Business while the user on Office 365 has no Audio Conferencing licensing assigned to it

Solution

The text of the error is saying that you can use the “BypassAudioConferencingCheck” switch

Since I want to use the Control Panel user interface instead of trying the “BypassAudioConferencingCheck” switch using PowerShell

I have created a new Conferencing Policy and cleared the check box “Enable PSTN dial-in conferencing”

After that, I assigned the new conferencing policy to the user

Then, I tired to move the user.

The user successfully moved to MS Teams.