Month: May 2021

Installing a Certificate (with its private key) on Ribbon SBC 1000 / SBC 2000 / SBC SWe Lite / SBC Edge

The steps below show how to install a certificate with its private key with the *.PFX format on SBC 1000 or SBC 2000

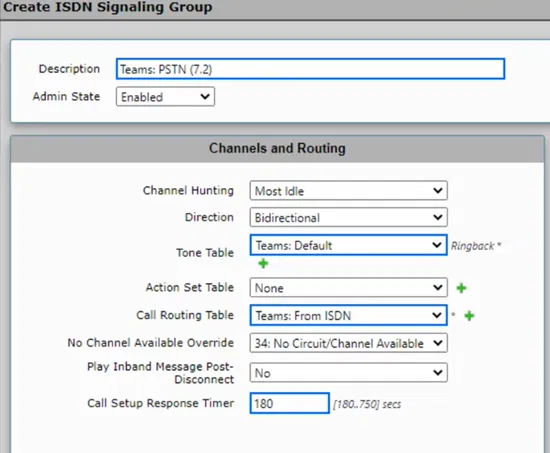
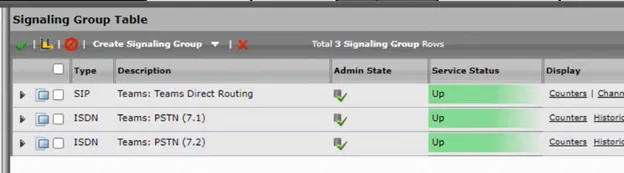
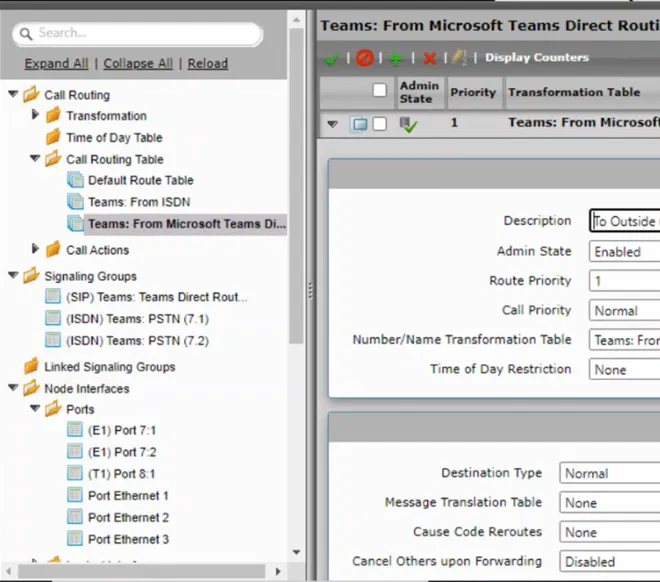
Installing such a certificate is needed when you are configuring your SBC to work with Microsoft Teams Direct Routing

The same steps can be followed in case you want to install a private certificate for example you are configuring the SBC to work with the on-premise version of Skype for Business

Note:

Before you install the certificate, you need of course to install the certificate of the Root CA where you have requested this certificate from and also you need to install an intermediate certificate(s) if that is required by your certificate provider. The procedure of installing certificate of the Root CA and Intermediate CAs are mentioned in a previous article.

The following    are the steps:

On the web interface, go to Tasks Tab


Go to SBC Easy Setup> Certificates


Click on SBC Edge Certificate

This will show the currently installed certificate on the device, and it will also give the option to import a new certificate


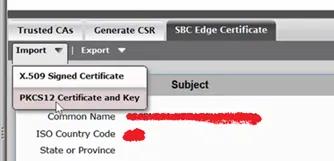
To import a new certificate

Click on Import > “PKCS12 Certificate and Key”

(This article only explained how to import a certificate and its key)


 A new window will pop up

select a *.pfx file and supply the password that is protecting the file
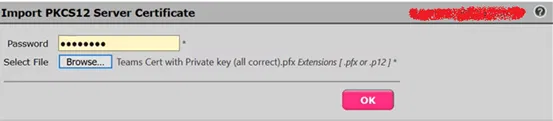

 Click on OK


 Click on OK


 The new certificate and the private key associated with it will be installed on the device and it will be shown under SBC Edge Certificate


Installing Certificates of Public CAs on Ribbon SBC 1000 / SBC 2000 / SBC SWe Lite (SBC Edge)

Before installing the public certificate, you have purchased for your device to make it work with Microsoft Teams Direct Routing, you need to install the certificate(s) of the public CA of your certificate provider (to trust that public CA)

You need to install the certificates in the following order:

  • Root CA cert
  • First Intermediate CA (the one issued by the Root CA)
  • Second Intermediate CA (the one issued by the First Intermediate FCA)

Below are the steps showing how to install the certificate of your CA

Go to Tasks Tab > SBC Easy Setup > Certificate > Trusted Cas Tab


Click on “Import Trusted CA Certificate”


The “Import Trusted CA Certificate” pops up


Click on “Mode” and select “File Upload”


It will change to “File Upload” mode


 Click on Browse


 Select the Certificate of CA file and click open


 The CA certificate will be uploaded.


Repeat the same steps if there is any intermediate certificate required by your certificate authority.

Installing Baltimore CA Certificate

If you are configuring your device to work with Microsoft Teams Direct Routing, Baltimore CA is required for communication with Microsoft Teams Servers over the internet. The device needs to trust this CA in order to have TLS communications with these servers.

User the same method mentioned above to install this certificate.


Enabling and additional PRI for Ribbon SBC 1000 / SBC 2000 after configuring the first PRI

In this article, I will explain how to setup additional PRI (ISDN) and configure to have the same configuration and behavior as the first PRI (assuming that we already configured the first PRI).

This is useful when you need to have more than 30 channels (concurrent calls) and you need to have the same configured settings and routes as the first the first PRI (each PRI support 30 channels)

Go to the settings tab

Click on the “Create Signaling Group” menu, then select “ISDN Signaling Group”

The “Create ISDN Signaling Group” dialog box will pop up and will be ready for filling

I kept the name of “Description” of the new signaling group same as the first one, but ending with (7.2) instead of (7.1) to indicate that I am using the second ISDN port

I am trying to use the same settings that was used in the first Signaling Group that was created by the wizard

Most important setting is the Call Routing Table, which control where the calls coming from this Signaling Group will be sent to.

Afte filling the dialog box, click on OK

The new Signaling Group will be shown under the list of the Signaling Group

If the PRI cable to connected, the Signaling Group will be up and will be shown as green

Making the new Signaling Group as the destination for the outgoing calls from Microsoft Teams

Expand Settings Tab > Call Routing > Call Routing Table

Select the call routing table that is used for the calls that are going out from Microsoft Teams

Expand the entry on table by clicking the arrow that is next to it

The details of the entry will be shown

Scroll down to “Destination Signaling Groups”

Click on “Add/Edit” button

Select the newly created signaling group and make sure that the original first ISDN Signaling Group is remained selected and click on the OK button

You will be back to Routing Table entry, and you will notice that new Signaling Group is listed as a destination

Click on Apply