Month: December 2018

Changing Administrator Password of CCE Host

You need to change the Administrator password of the CCE Host in order to access it. Or maybe in case you forgot the configured password

Following these steps to change the password of the CCE Host

Click on the Settings tab

The following image show how to Settings tab looks like

Expand “Application Solution Module”

Go to “Chance Admin Password”

Under the “Password Option” setting, select “User Configured”

Specify the new password and click on OK

Under “Current Activity Status”, you will be prompt that the password is changed successfully

Re-initializing ASM (CCE Host)

In this article, I will explain how to Re-initialize SBC 1000 CCE Host

You usually need to re-initializing CCE Host when you are going to reuse the device in a different deployment, in a different site or utilizing a higher version of CCE (you can upgrade instead of reinitializing). Or even if you want to start fresh.

In my case, I got the device that was used in a different POC and now I am deploying it on a new site

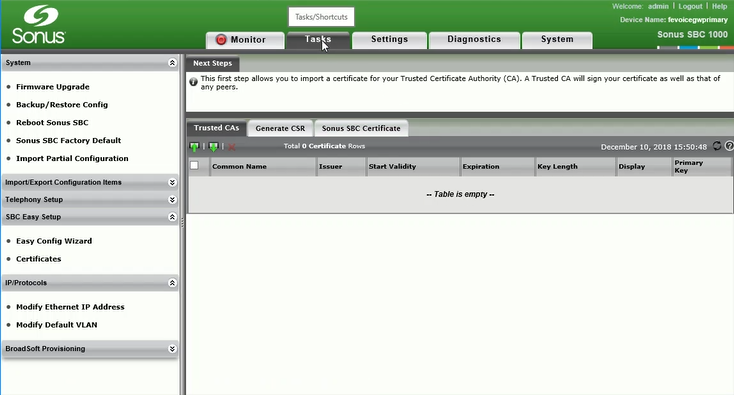
On the Tasks tab, under Application Solution Module, select Operational Status. It might take a few seconds until the “Operational Status” page is shown

This page shows the IP, name, and status of ASM (CCE Host)

Scroll down a little to “Office 365 CCE Status”, and you will be able to see that status and basic information about the 4 VMs of CCE

On the Tasks tab, under Application Solution Module, select “Reinitialize”

Select the correct ASM image that you want to re-initialize with (you might have different versions)

Click on Apply

Click on OK

You would be able to see the status of the Re-initializing process under “Current Activity Status” as shown in the image below

When the process is completed the “Current Activity Status” will show that the re-initializing is completed successfully

When you select “Optional Status”, and “Office 365 CCE Status”, you will notice that there are no CCE VM available.

Upgrading SBC 1000 Firmware

On the Tasks Tab, under the System menu, select Firmware Upgrade

It will force you to take backup of the SBC

(you have the option to provide a Passphrase to protect the Backup file)

Click on Backup

You can save the backup file to a specific location if you want

Now you can select the Firmware file

Click on Brows

Select the Firmware file and click on Open

Click on Upgrade button

Click on OK on the dialog box after reading it

The process of upgrading the firmware now started

After the upgrade is completed, a restart will be automatically performed

Logon and go to System Tab and then go to “Abound Sonus SBC”

If the upgrade is successful, you will see the Software Version is changes

SBC 1000 Initial Setup

In this post, I will explain how to perform the Initial setup of Sonus (Ribbon) SBC 1000.

Connect your computer to the second Ethernet port of SBC 1000 and wait until the it finishes booting up (about 5 minutes) and make sure that you have got an IP address from the range 192.168.192.2. The SBC is providing a temporary DHCP to give your PC an IP address for easier config. This DHCP will not be enabled after completing the Initial Setup

The following two pictures shows a typical configuration. The changed options are marked with thicker rectangles (the web interface automatically adds these rectangles)

The IP address you have provided will be used for the Ethernet Interface number 1 in the front panel

In the above configuration, we have also configured the IP address of the Ethernet Interface number 2 to be same as the one used during the initial configuration. This would help us to access the gateway on Ethernet Interface 2 with its default IP in case we have a problem with the first interface or we have forgot its IP.

Note that we select the option “Don Not Launch” for the “Easy Setup”

Click on OK

Click on OK on the Dialog Box

Connect the first Ethernet interface to the network (if you have not already done that)

Enter the IP address of the gateway in the browser, it will show the following page only the first time you connect to the gateway on this browser using this address

Click on Enter, it will take you to the logon screen

Enter the User ID and the Password you have supplied during the initial setup and click on Login

You will be taken to Tasks Page/Tab, unless you have selected to Launch Easy Setup in the initial setup step